

Note that this guide is mainly for the gold trophy as it requires a perfect score of 180.
This is a semi-advanced guide to beating the game, tips, suggestions and most of all pictures for better understanding will be posted when necessary to explain the game further.
For the Gold trophy you have to complete the game during the first day of the month, and be relatively fast while doing it, silver can be done even 2 days after if the other players are slow.
This game is mainly based on strategy and requires *strong nerves / perseverance with a bit of luck on the dice*.
As of September, Invasion of Meridell is under maintenance, so when it comes out you will still have time to earn these spectacular prizes.
The first prize place is considered highly due to the difficulty in obtaining it.
Before you go through the guide it's good that you know that completing the game in hopes of the Gold Trophy will be extremely time consuming, if you want to earn one of those fancy trophies but don't have time to spend on this game then you're better off getting someone to do it for you, in that case disregard this entire guide, oh and This is the place for you
 .
.


Shiny !

There are a total of 10 missions and 3 waves for each one that I will call rounds, the first 5 are relatively fast to complete, the other 5 will require some intense patience... ever tried scoring 5000+ on Castle of Eliv Thade legit? It's more or less the same when you go through this game, just less page swapping.
At the end of Mission 5 you will obtain this medal:

The Bronze trophy is pretty easy to obtain, if you complete mission 6 in one day you'll get it, silver will require at least mission 7.
The points you score are equal to the number of villages you save, if you're aiming for the 180 score (required for gold) and a village is sacked, you will have to restart the mission... this is a must!.
What makes this game so time consuming is that you will have to "Farm" for kills to increase your rank, and this can take a long time since you will have to do it for each of your characters, but we will get to that later.
To begin, you start the game with 5 fighters who you will keep until the end of the game, a Meohog, a Techo, a Scorchio, a Skeith and a Grundo, some guides suggest that you could maybe abandon a skeith / scorchio for an extra grundo later in that game but I recommend keeping your starting party.
When you start the game check the stats of these characters, ,the Meohog and Techo should have a strength equal or above 8, if not restart the game until you get similar stats, the higher you get the better.
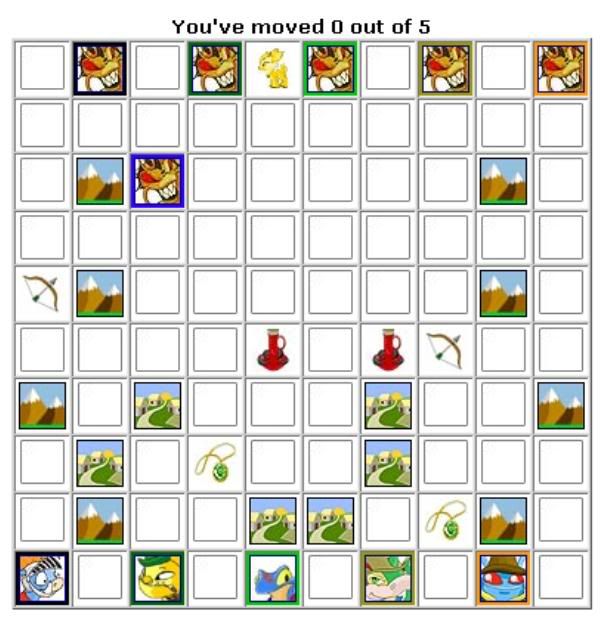
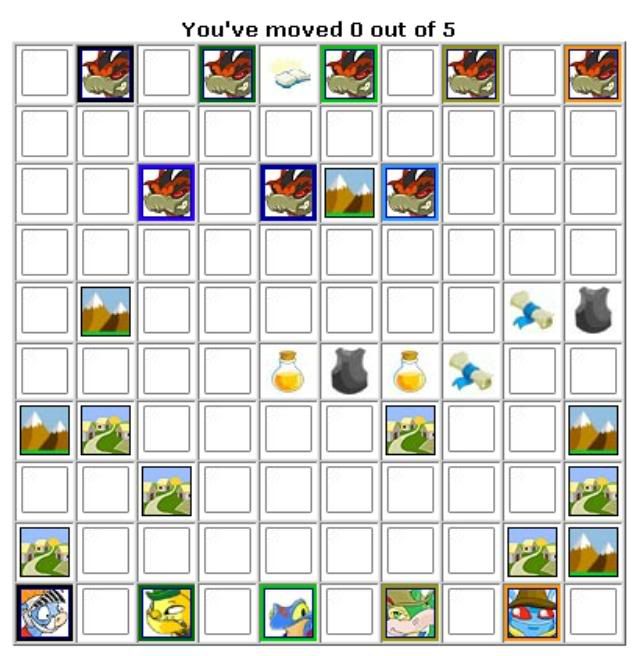
Below is what your average game will look like:

If they sack 5 villages you have to restart over, if you decide to restart the game for a different amount of reasons just press the end turn now until the invaders ravage the villages...savages.
Meohogs can move 5 spaces per turn
Skeiths can move 1 space
Techos, Scorchios and Grundos can move 2 spaces.
Give them each names so you can distinguish them easily, I like to name them after film characters and consider the Skeith my most important asset.
To win a round you must defeat all the invaders, if you defeat an invader meohog, it will turn into a meohog soldier and you gain full control of it, same goes for invader Skeiths/ Scorchios/ Techos/ Grundos, when defeated they will each turn into a soldier of the same race, however you do not get additional moves for the turn.
If one of your soldiers is defeated by an invader, it will turn into an invader and become the same species as the fallen soldier, so if your Techo dies it becomes an invader Techo, and your opponent will gain full control of it, note that you are limited to 5 moves each turn, however your opponent can move each of his invaders each turn.
In case I'm confusing you when I mean opponent I mean the opposite side that however isn't being controlled by a player, so it's moves will be predictable and will act the same way every time.
When you win the round you will be asked to procede with only 5 troops, you must then select your starting soldiers and get rid of the ones you accumulated during the round.
If you look at the picture above you can see a box for each of your characters and enemies stats (Health, Attack, Defence) all very important for the battling phase, as starters keep in mind that to attack an enemy it must be in a space next to yours as shown below:

Weapons
Weapons and armors boost your characters' strength / defence, most of the equipment grants special bonuses to certain species, below is list of the items you can obtain and what they do: *list copied from JN, read the notes and suggestions*

Attacking consists in rolling a dice *cheers* the number obtained is going to be between 1-20, this number will be added to your character's Attack strength and furthermore increased by your character's weapon.
Let's take for instance the skeith in the above picture in the strength box he has 18 + 4, 18 is his normal strength value, 4 is his weapon bonus for a total of 22, if he rolls a 5 the total value will be 27, if you look at the Invader Meohog 00, his defence is 9, in this case you subtract 9 from the 27 score, for a wooping 18 damaging points, the invader's health is only 12, so he will be converted and you will gain full control of the converted invader.
Now we get to the boring stuff, to beat this game you will want to max out your rank in the first 5 missions, you can only increase your rank once per mission and once done you will not be able to add kills to your "Head Bounty Trophy Case* and to do so you must kill a certain number of invaders with each character, you might ask why we want to do so, well the answer is that for each rank your strength / defence increase making the rest of the game easier for yourself and certain ranks unlock certain abilities for your characters if equipted appropriately.
The following is a tab with the number of kills needed for each rank:
![]()
Lost Items
Last thing on the starting list are the Lost Items:


Check the starting image, in the first row at the top you will see the same cup illustrated, this is the first of the Lost items to be recovered.
These items will give your characters 1 point in Strength and in Defence, they will appear in each round unless collected, and there will be a different item for each mission, if however you collect the item it will not reappear even if you restart the mission, these items will also disappear for the round if there are less than 2 invaders alive on the board, you must only collect these items on round 3 when you are certain you will manage to complete the mission for if you fail and collect the bonus the item disappears for good along with the bonus.
The bonus these items give does however will not vanish if you complete the mission successfully.
Advanced Ranking: We've learned about ranking but you may wonder how exactly you're supposed to max out a rank in each mission when some require such a high count.
At the beginning of the guide I talked about farming kills for ranks, this consists in:
1. Narrowing down the invaders to a number that you are sure you can control, so they won't run around destroying everything in sight.
2. Having a certain number of soldiers being forced converted back into invaders with the goal of then re-killing them for the convertion points.
These soldiers MUST be the ones you converted during the round, this means that they used to be invaders but turned to your side once you defeated them, by no circumstance allow your main characters to die!.
In other words, when they are converted into invaders you will re-defeat them, once this is done just rinse and repeat until you max out the rank for each of your characters.
Note, by the end of mission 5 your Grundo and Skeith must be corporal ranked, preferred if all your characters reach that rank.
Luckily if you do not manage to do so, your other characters will end up getting enough kills to top it off eventually... however this makes the game harder for yourself.
Once you reach Corporal rank on all characters you don't need to farm for kills *sigh of relief*.
If you just intend going for the avatar, I've managed to do so without reaching the corporal rank at all, lieutenant/ captain did it for me.
Follow the positioning tip number 2 for farming shown in the next step
Now that that's done we may continue to the helpful tips involved in controlling your opponents moves:
Positioning
1. Barricade

S = Free Space. (Might have gone overboard)
Using this positioning those two invaders will not move, in other words they won't move into any of the S tiles.
Note: S means FREE space, but even if a weapon/potion/armor were there they still wouldn't move, however if a Village were in one of those S tiles, no matter your character's position, the invader would still go for it if it were 1 tile away from them.
This technique is essential to beating the game, however it does get risky in certain missions when the invaders hit extremely high and does require some group manipulation, in other words you will need to do your best to either limit the damage by having multiple characters step in, or kill them off fast.
See positioning number 2 for priorities.
2. Priorities.

This involves rank farming and is the 2nd most important lesson in positions:
This table shows who, most likely, the invader will strike, 1 being the invader's highest priority and 8 being the lowest.
However, the external columns (3-5 and 6-8) seem to occasionally change, in way that the positions are mirrored and the sides are switched, but you can get by without this last info.
When farming for ranks make sure that the soldier you want converted into an invader is in position 1, this way it will be the one target attacked.
There are more positioning moves, but these 2 alone will do for example on JN there are some further moves, however I find them rather irrelevant and really useful.
I do advice you checking the drawing technique on that site though as it will explain it better me, it's not a necessary positioning routine to master but it may come in handy in certain situations, for example if you need an extra heal on a character low on hp and draw the invaders backwards with a converted bate.
Mission detailed account
I will do my best to explain the situation during each mission, most are repeaters of the previous ones so I'll just upload pictures on the missions that are particularly tricky.
I advice to follow certain of these guidelines, but what I've noticed is that personal experience is what will make you succeed most of the time.
Mission 1: First of 10, easy start for beginners, make sure to intercept the invaders blocking any possible gaps that place them 1 space away from a village, use the Barricade positioning.
Make sure your Grundo picks up the staff and try to arm each of your character.
You might not need to, but it's best to keep a healing potion on board at all times just in case.
Last thing, all your characters must be promoted to rank Defender
Mission 2:
Note the necklace in the 3rd row next to your Skeith, if you're going for the 180 score, restart the game until the necklace is two spaces away from your skeith, once picked up teleport to the 5th row, right on top of the village 3 squares from the left so you can block the incoming invader.
Make sure your Scorchio gets the bow in this mission as when he hits the rank of soldier he will be able to shoot an invader up to 2 spaces away from him, to use this ability click the Scorchio and then click the invader you wish to shoot.
Use the barricade positioning to stop the invaders from getting past row 5.
Note I count the rows starting from the bottom.
Keep upgrading your characters' weapons/armor even if it's not intended for their species, some equipment is better than none, just make sure you prioritize.
Make sure your characters are promoted to rank Soldier.
Mission 3:
Teleport your Skeith to form a barricade formation in the middle of the two invader Skeiths advancing, shouldn't need a picture for this as it's pretty straight-forward.
Make sure you Grundo picks up the scroll so he can heal!
To heal a fellow character you will need to click the Grundo and then click the character you want to heal.
Make sure your Characters are promoted to rank: Captain
Mission 4:
Teleport your Skeith to coordinates (6, 6) bear with me, x is from left to right, y is from bottom to top (x,y).
Note your other characters have to be swift in regrouping with the Skeith, use the positioning guide shown above to get some of the invaders off the Skeith as he will have all 3 of the invader Scorchios on him.
Make sure he doesn't get over damaged and keep him fully healed until the invaders killed
By the end all your characters should be rank Lieutenant.
Mission 5:
By now you should have gotten an idea of what to do with your Skeith to stop the invaders, this level doesn't require any particular positioning, just keep using the barricade positioning.
Make sure your Meohog equips Counter Enchantment Helmet, you'll need it in the later missions.
Get all your characters to rank Corporal, and guess what, you're done with farming kills! It must have taken you a while now to do so, but you're actually saving time by doing this as will be explained for the future missions.
Mission 6:
You will notice the old invader Meohogs along with 2 new types of invaders, the buzzes.
Invader Buzzes will not be converted to your side when killed, they will vaporize leaving their spot in ashes and un-utilizable.
Note the Meohogs are stronger than when you first faced them, so don't take them lightly but you should start by converting the Meohogs and then the buzzes, when you reach them you'll see why.
Make sure your Techo picks up the sword since it will be needed later on.
If your Grundo is placed under a spell have your Meohog free him, simply click the Meohog and then your Grundo.
The buzzes and the to-come Grarrls are what make missions 6-10 a pain, these starting ones are just the beginning as their defence will just keep increasing... just hang in there and defeat them one at a time.
I tend to force my characters all on one of these new invaders as long as the others are barricaded and don't move.
Mission 7: Ready for your avatar?
This is basically a rinse and repeat of mission 6, start with the Techo invaders like usually and then burn the buzzes when left.
This mission will take longer than the previous one.
Mission 8:
Invader grarrls O.O!
Mission 8 was the toughest for me, these Grarrls have high attack and low defence, you will need to keep 2 moves for your Grundo to heal each turn, make sure to keep all your characters up high in health.
Focus on the invader Scorchios and then move to the Grarrls, you might need to redo this level more than once.
You might want to use that Techo sword to unfreeze your Skeith 
Mission 9: Grarrls 2!
Mission 9 is easy just very very long, the Grarrls are back but don't hit nearly as often, however their defence has gotten boosted, shame.
Follow the tactics for the previous missions and you'll be fine, by now you'll understand why I say that this game can be so frustrating... just wait till mission 10.
Mission 10: The Final Battle.
Mission 10 is absolutely terrible, easy, but incredibly annoying, and most of all, LONG... Bloody hell.
There is nothing new about this level, just hang in there, that trophy is almost yours!!
If you've made it this far I'm guessing you either finished the guide or just skipped to the end, clever, Congratulations if you completed mission 10, if you were quick enough you're going to wake up with a new golden trophy!
Was it worth it? That's up to you to decide.
Mission pictures taken from: http://home.neopets...._name=happylark, this site is also handy.
If you require any additional help just Pm me and I'll see what I can do
Thanks for reading and GL beating one of the most boring games on Neopets... you'll see what I mean once you try.