

Tristen's Photoshop Tutorials
Making A Color Splash In Photoshop CS5
What is this tutorial about?
Today I am going to show you how to color splash a image in Photoshop CS5. If you don't get a step read it over a few times. I have made the tutorial to work in photoshop CS3 and later but there may be some things which are not the same. To download the 30 day free trial of Photoshop CS5 go here.
The Tools

Step 1: Getting Started
First you are going to open Photoshop. Then you are going to open your image by going to your navigation bar at the top and going under File - Open and chose your image to open.

Step 2: Selecting Image
You will now Go to your sidebar and click the Quick Selection (Tool #4) on the sidebar and select your image. Simply click inside your image to select the part of the image you will want to be color and not black. Once you have selected your image and there are crawling ants around your selection go to the top and click the button refine edges on the navigation for the tool because no selection is perfect. Go under Edge Detections and click smart radius and put in these numbers then click ok.

After you click ok you will see the selection is a lot more better. But there are some selections inside your image and on the outside that you don't want. If you don't skip to the next step. But if you do simply click on the selection if it is on the inside and if it is on the outside click alt on your keyboard then click the selection to get it what you would want the color to be.
Step 3: Copy & Paste
After you have selected your image go to the navigation bar at the top and go under edit - copy. After you have done that go under edit - paste. It should look like this in your layers box.

Step 4: Black & White
Now we are going to change the selection color and the out side of the selection black and white. You will now go to the layers box and select the layer on the bottom.
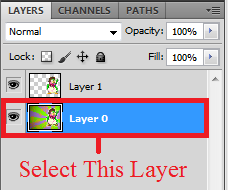
Once you have selected the layer go to your navigation bar at the top and go under layer - New Adjustment Layer - Black And White. Click ok and you are done! This is what my finished copy should look like.

Making One Side Light And Other Gloomy & Brightening an Image
Step 1: Open Image & Duplicating Layer

^This Will Be The Image I will be Using^
First open your image then duplicate the layer by right clicking your mouse on your layer then click duplicate layer.
Step 2: Curves
Once you have opened and duplicated your layer click on your duplicated layer. Mine is Layer 0 Copy.

To open curves go to Image>Adjustments>Curves. It should look like this.

Now that you got it open click about here.

Once you have click it move it until your image is light enough to you then click okay. This is how mine looks and with the curves added.

Step 3: Adding Half & Half Effect
Now that your image should look bright and not gloomy any more we are going to make it look bright on one side and gloomy on the other. Click the Rectangular Marquee Tool and select half the image with it. Should look like this once you apply the Marquee tool.

Now click the Backspace key on your keyboard and deselect then you have the half and half effect. Here is my final result.

Turn A Photo into Sketch using Photoshop CS5

^This Will Be The Image I Will Be Using^
Step 1: Duplicate Layer & Desaturate
First of you will need to duplicate your layer by right clicking your layer in the layers Window and click duplicate layer. On you copied layer go to Image>Adjustment>Desaturate and then duplicate your copy layer. Your layers Windows should look like this.

Step 2: Invert You Layer & Change Blend Mode
Next you will need to invert the layer which should say Layer 1 Copy 2 by going to Image>Adjustment>Invert. Now on Layer 1 Copy 2 (Inverted Layer) go you your layers Window and click here.

In the drop down dialogue click Colour Dodge.
Once you have chosen Colour Dodge go to Filter>Blur>Motion Blur plus you can also use Gaussian blur too if it looks more like a sketch. . Usually the setting the is set is good but you can adjust them a little bit if you would like.
You are now all done! This is my final copy.

Blending Two Images [HD]
Using The Marquee Tool [HD]
Select with the Magic Wand Tool [HD]
Rotate A Selection [HD]
Adding Color to a Black & White Photo
In this tutorial I will show you how to add color to a black & white photo in Photoshop CS5.1.
1. Find a Image
I have decided to chose this image with 4 girls walking down the street from the 1940's or 1950's. But I want the girls to stand out from the rest of the photo.

2. Selecting the area you want to color
1. Select the quick selection tool.
2. Using the quick selection toll select the area you would like to color.

^As you can see I selected the women on the far left^
3. Adding color to the selected area
1. Go to Image>Adjustments>Color Balance
2. The color balance box looks like this.
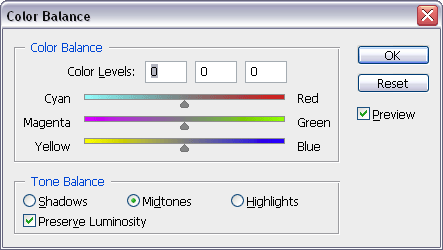
Now move the arrows right or left until you get the color you want. Once you have the color click OK.
My Result:

Repeat steps 2 & 3 over until you like the result.
Final Result:

Edited by Tristen, 09 July 2012 - 04:16 PM.