So I've had very little time to update this blog but I finished my cosplay past week  And then the outdoor convention was so rainy, I couldn't wear it all day ;.; So sad.
Also, I need to work on making process pictures 
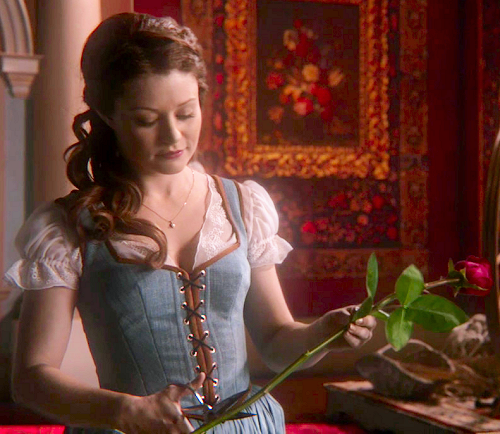
So next step was to sew everything together, match up lining & outer fabric and make it one corset. And everything looked fabulous! Until I fit it. Same old boob problem. I had to take it out around my breasts a little, yay for remembering extra seam allowance. Once it fit properly it was time for my fake leather bias tape & the eyelets.
Top almost finished, time to leave it be and work on the skirt.
The skirt was so straightforward I finished it in an hour and forgot all about pictures. It was just a straight skirt, 9 panels because it needed a lot of gathering at the top. So this is how it all looked together. Nearly there.

I decided against an underskirt because it was full enough already. With the skirt completed, I focused on the hardest part. Sleeves. I never made a sleeve before, especially a puff one. So I drafted a pattern & with a bit of fumbling I managed to get two pretty puffed sleeves and a collar.
Next comes the only thing I'm a bit bummed about. Belle's sleeves and collar have a super pretty embroidery on it. My friends mom has an embroidery machine that allows you to input drawings. So I added my rendering of the embroidery and tried it out on scraps. And it looked like crap  Turns out my fabric was too thin to embroider properly. A bit of a let down my brain came up with a second idea when I was half asleep. 3D textile markers. Next morning I went to the shop, bought two separate markers. One with a pearl effect, one without and tested them.

Again I wasn't very pleased with it. Fabric was too thin and soaked up the paint & it looked plastic.
So I ditched the idea of embroidery and left the sleeves & collar for what they were and just added them to the top. One day I'll remake them in more sturdy fabric that can be embroided.
Dress DONE! *dancing*
Wig was super easy. I bought a lace front. I'm very picky in wigs. I always prefer a lace front and prefer giving out some more for them. So I ordered from my favorite site, Wig Is Fashion, and the bonus with them is that they come styled in neat curls and a center part. So it just needed a bit of a twist on the side and I decided to add a bow.

I decided to add a last part to my cosplay. Chip the cup. I found a cute little cup in the thrift store & got a friends brother to sand it down for me and cut a chip with a dremel tool.

I present Chip the cup after painting.

And a few con snaps I have. I hope weather gets better soon because it's filled with cherry blossoms down the road of my home and perfect for pictures.


I so hate the filter they put on these ;.; I always look like I have no eyebrows.
So this was the fastest I ever made a cosplay I hope some enjoyed seeing the process and now I'm back and forth to deciding which cosplay to make next.